There are multiple ways to try any Linux distribution on Windows 11 or Windows 10 computers. However, Hyper-V is the native virtual machine app that you can use to install Linux Ubuntu on your PC. As it is a virtual machine app, your hardware must support virtualization, and it needs to be enabled in the BIOS.

There are two ways to install Ubuntu on Hyper-V in Windows 11/10 PC – downloading the image by Hyper-V using Quick Create and setting up the virtual machine manually. In this guide, you can find both methods and use either of them that you like.System Requirements:
There are some system and hardware requirements that you must follow:Hyper-V needs to be enabled in Windows 11/10. You can do that using the Windows Features panel.Your hardware must support virtualization. If it has the support, follow this guide to enable hardware virtualization from BIOS.You need to download the Ubuntu ISO from the official website, ubuntu.com. However, this step is mandatory only if you follow the second method.You must have an internet connection if you follow the first method.
Before getting started, you need to create a virtual switch for Ubuntu. Otherwise, you cannot install this Linux distribution.How to create a virtual switch in Hyper-V for Linux Ubuntu
To create a virtual switch in Hyper-V for Linux Ubuntu, follow these steps:Open Hyper-V Manager on your computer.Right-click on your computer name and select the Virtual Switch Manager option.Click on the New virtual network switch and select the External option.Click on the Create Virtual Switch button.Name the virtual switch you like and click the OK button.Click on the Yes option.
After that, the virtual network switch will be created and ready to use on Hyper-V.How to install Linux Ubuntu on Hyper-V using Quick Create
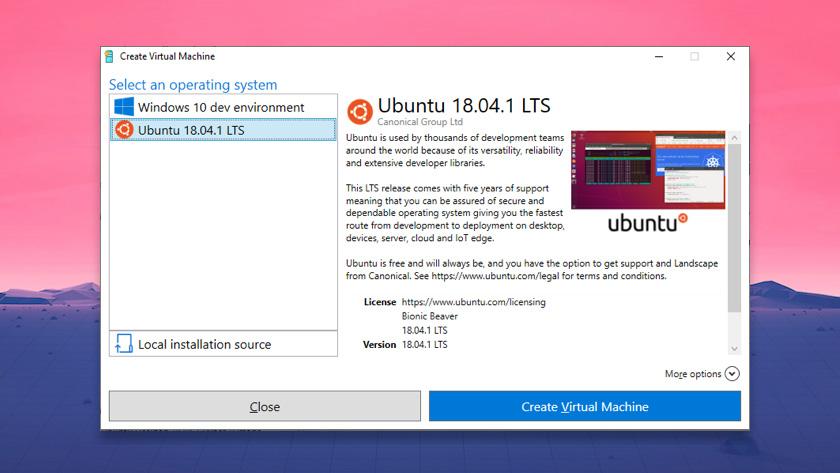
To install Linux Ubuntu on Hyper-V using Quick Create, follow these steps:Open Hyper-V Manager on your PC.Click on the Action > Quick Create.Select Ubuntu 20.04 on the left side.Click on the More options button.Expand the Default switch list and choose the virtual switch you created earlier.Click the Create Virtual Machine button.Right-click on the virtual machine and click the Connect button.
To learn more about these steps, continue reading.
At first, you need to open the Hyper-V Manager on your computer. Then, click on the Action option in the top menu bar and select the Quick Create option.

Alternatively, you can select the computer name on the left side and click on the Quick Create option on the right side as well.
Once done, choose Ubuntu 20.04 from the list visible on the left side and click on the More options button.
Next, expand the drop-down list, and choose the switch you create earlier.

After that, click on the Create Virtual Machine button.
Once you do that, it will start downloading the Ubuntu 20.04 LTS ISO from the official website. After completing the download, a virtual machine will be created automatically. You can right-click on the virtual machine and select the Connect option.
Then, you can follow the screen instructions to finish the installation.How to install Linux Ubuntu on Hyper-V manually
To install Linux Ubuntu on Hyper-V manually, follow these steps:Open Hyper-V on your PC.Right-click on your computer name and select New > Virtual Machine.Enter a name for your virtual machine and click Next.Select Generation 1from the Specify Generation tab.Enter at 2 GB of RAM in the Assign Memory tab.Expand the drop-down list and select the switch you created earlier.Select Create a virtual hard disk option and click the Next button.Select Install an operating system from a votable CD/DVD-ROM option.Click on the Image file option and click the Browse button to choose the downloaded ISO.Click on the Finish button.Right-click on the virtual machine and select Connect option.
Let’s delve into these steps in detail.
At first, open the Hyper-V Manager on your computer, right-click on the computer name and select New > Virtual Machine.

Then, click the Next button and enter the virtual machine name you like.
In the next tab, Specify Generation, you need to select the Generation 1 option and click the Next button.

After that, enter at least 2048 MB or 2 GB of RAM in the Assign Memory tab and click on the Next button.
Next is the Configure Networking option. Here, you need to expand the drop-down list and select the virtual network switch you created earlier.

Following that, select the Create a virtual hard disk option and enter the size of the virtual hard disk. If you do not want to specify the size, you can go with the default setting.
In the next step, you need to choose the Install an operating system from a botable CD/DVD-ROM option, select the Image file option, click on the Browse button and select the Ubuntu ISO file.

Once done, click the Finish button, right-click on the virtual machine and select the Connect option.
Then, it will show you some options and instructions that you need to follow the finish the installation.
NOTE: You can also free download Windows 11 Enterprise virtual machine from Microsoft.Can you install Ubuntu on Hyper-V?
Yes, you can install Ubuntu on Hyper-V in Windows 11/10. There are two methods you can follow. First, you can let the Hyper-V download the Ubuntu ISO file and create the virtual machine. Second, you can download the ISO file and create the virtual machine manually.Is it possible to install Linux on Hyper-V?
Yes, it is possible to install Linux on Hyper-V. You can try most of the Linux distributions in Windows 11/10 via Hyper-V. For example, it is possible to install Ubuntu, FreeBSD, Debian, etc. However, you must create a virtual network switch for better compatibility.
That’s all! Hope this guide helped install Ubuntu on Hyper-V.


Thank you for your sharing. I am worried that I lack creative ideas. It is your article that makes me full of hope. Thank you. But, I have a question, can you help me?